Table of Contents
Step 1: Log in to your LinkedIn account
Step 2: Navigate to your account settings
Step 3: Access your email addresses
Step 4: Add a new email address
Step 5: Verify your new email address
Step 6: Make your new email address the primary email address
Step 7: Remove your old email address
Step 8: Save your changes
Why & When to Change Your Primary Email
On Mobile (iOS & Android) Step-by-Step Guide
Email Privacy & Visibility Control
Quick Checklist: Changing Your LinkedIn Primary Email
Conclusion
Frequently Asked Questions
Modified On :
May 22, 2026
Key Takeaways
- Your primary email on LinkedIn is essential for notifications, messages, and account recovery.
- Always keep your email updated to maintain security and uninterrupted access.
- You can easily add, verify, and set a new email as primary from Settings & Privacy → Sign in & Security.
- Old or unused emails should be removed once your new primary is verified and active.
- LinkedIn’s mobile app offers the same step-by-step process for iOS and Android users.
- Don’t forget to adjust your email privacy and visibility settings to protect your personal information.
LinkedIn is an online platform that is essential for professionals and job seekers. It is a great tool for networking, job searching, and connecting with colleagues in your field.
Your email address is an essential part of your LinkedIn profile, as it is the primary way that you receive notifications, updates, and messages from the platform.
In this blog post, we will show you how to change your primary email address on LinkedIn.
Step 1: Log in to your LinkedIn account
The first step to changing your primary email address on LinkedIn is to log in to your LinkedIn account. If you are not already logged in, go to LinkedIn's homepage and enter your email address and password.
Once you are logged in, you will be taken to your LinkedIn homepage.
📈 More Than Just an Email Update
Fixing settings is easy, turning LinkedIn into a lead machine is where we come in. Our outreach campaigns start at just $397/month.
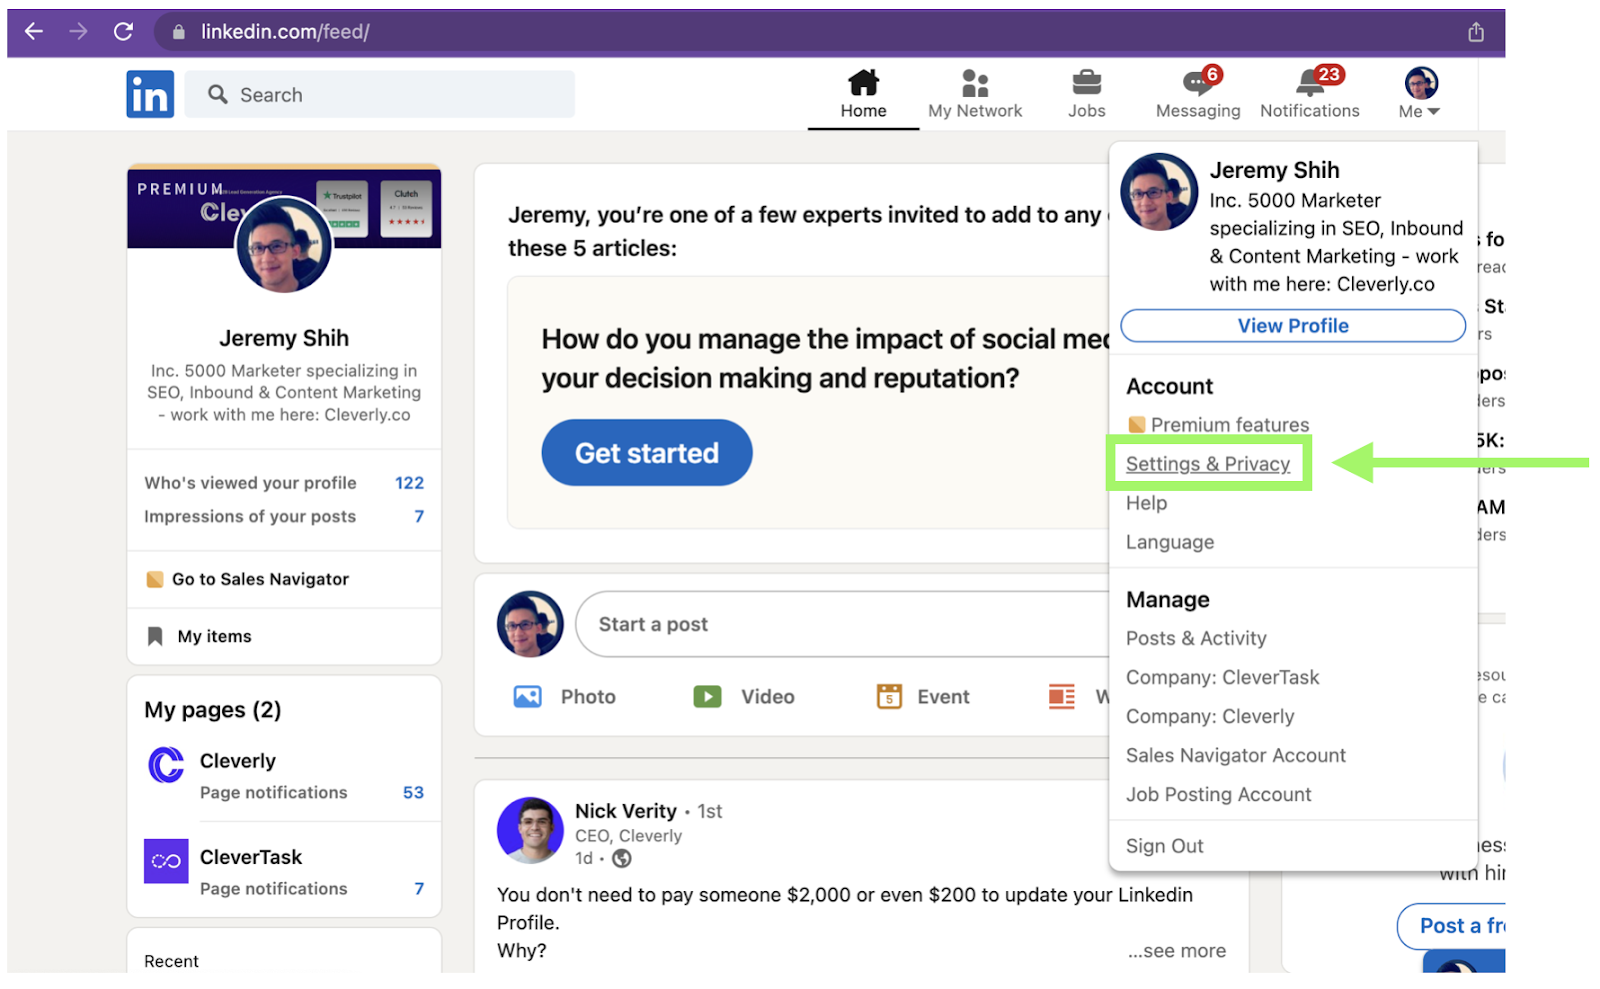
Step 2: Navigate to your account settings
To access your account settings, click on the "Me" icon located in the top right corner of the LinkedIn homepage. A drop-down menu will appear, and from there, click on "Settings & Privacy."
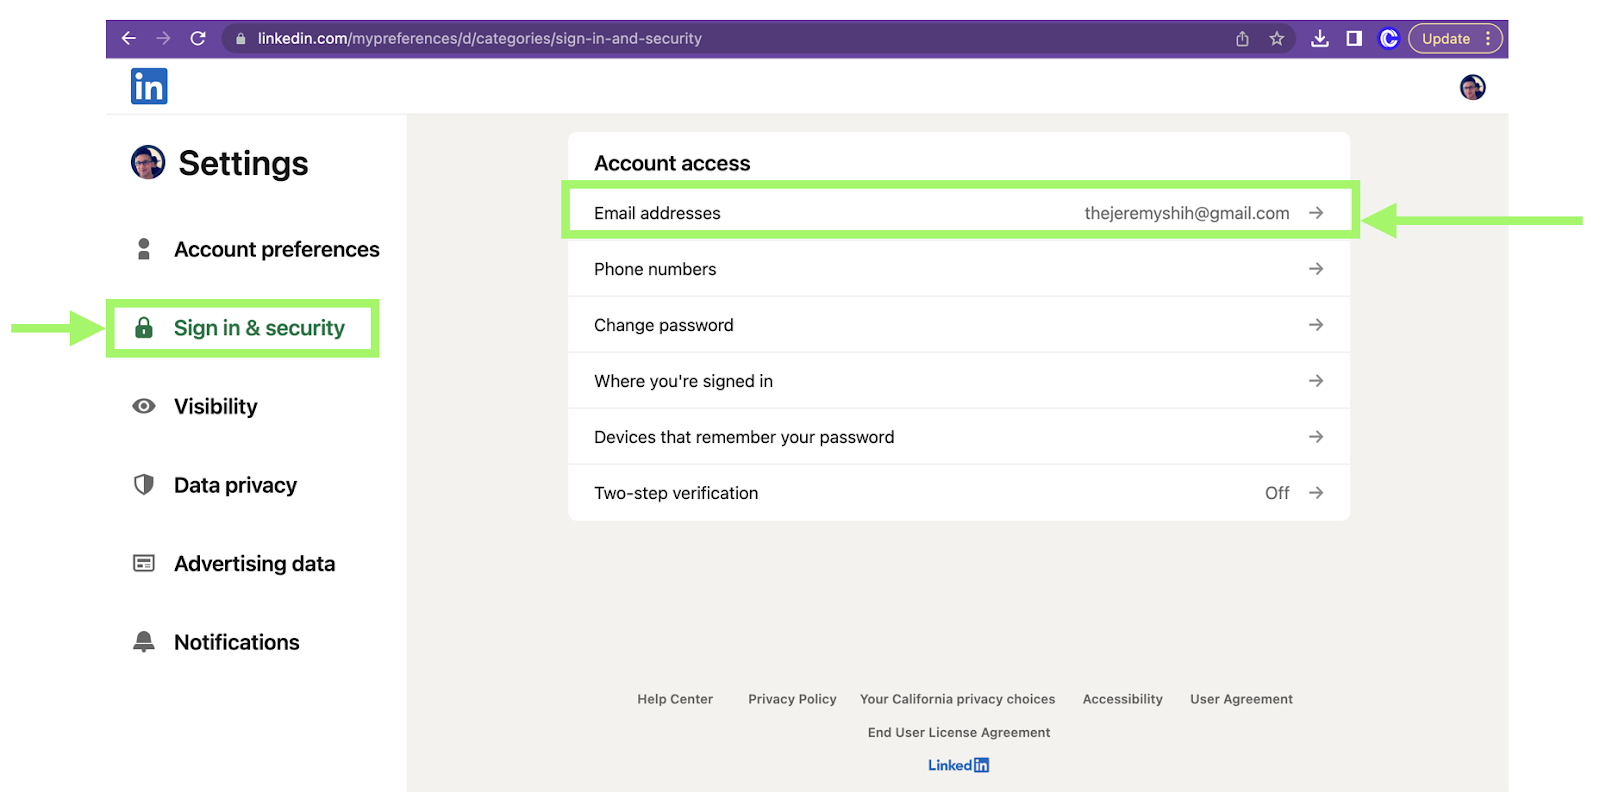
Step 3: Access your email addresses
Once you are in your settings, click on the "Sign In & Security" tab (on the left hand side menu), and then click on "Email addresses" located under the "Basics" section.
🚀 From Profile Fixes to Pipeline Growth
Changing your email won’t get you clients, but our done-for-you LinkedIn lead gen will. Book your free strategy call today.
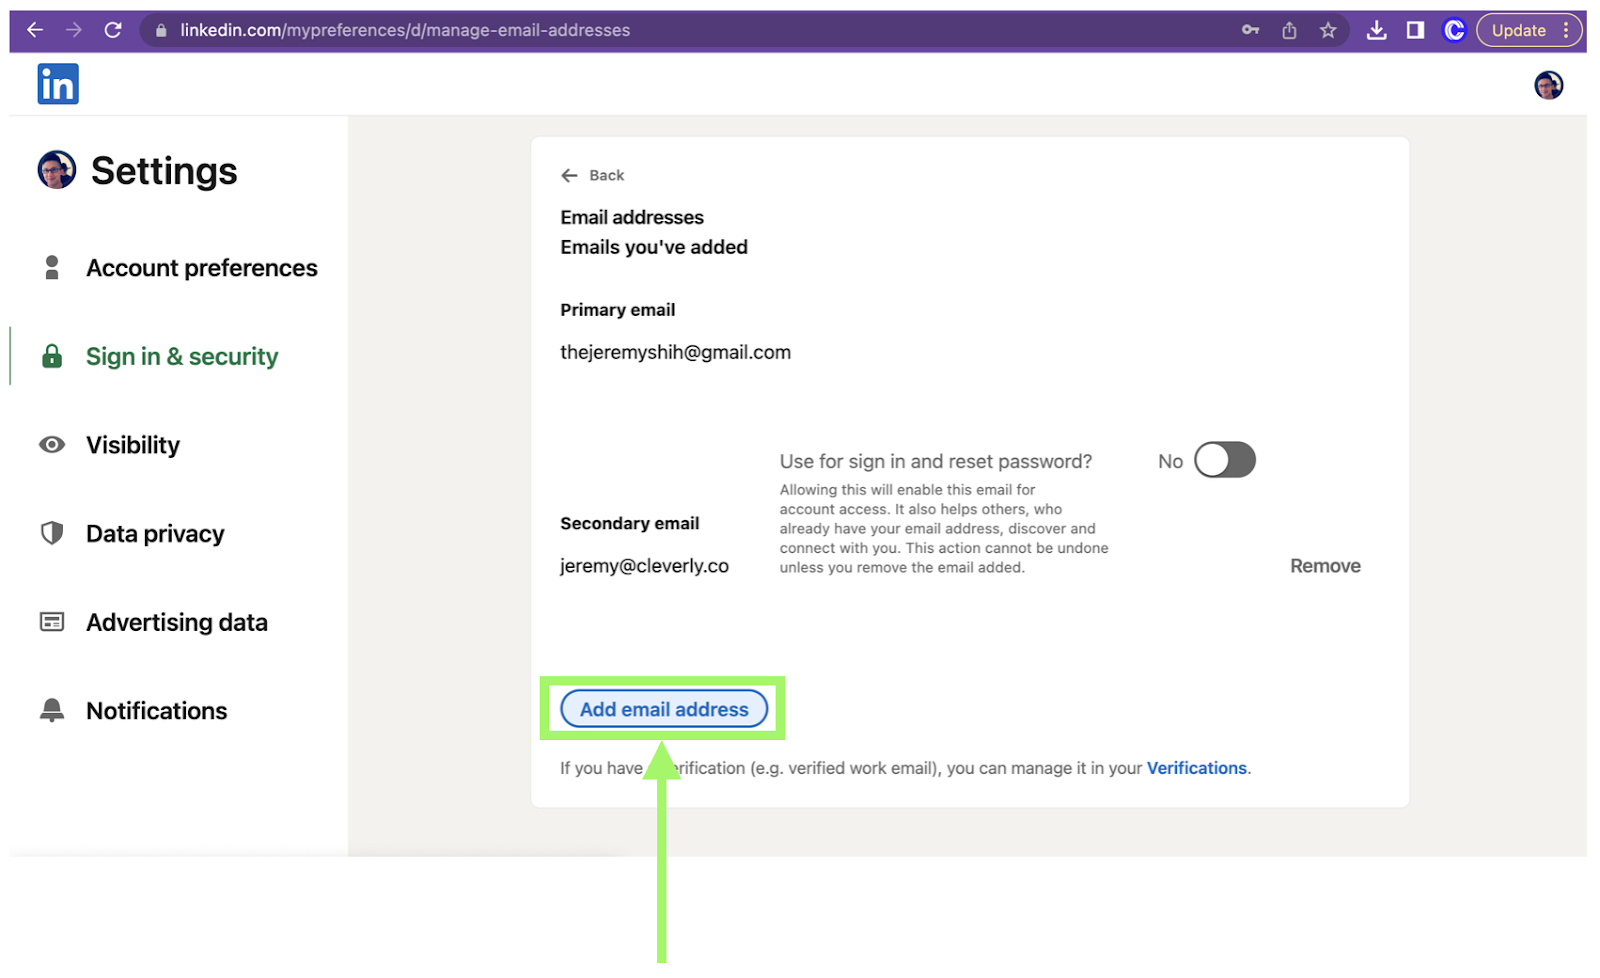
Step 4: Add a new email address
To add a new email address, click on the "+Add email address" button located on the right-hand side of the screen. Enter your new email address in the field provided, and then click "Send verification."
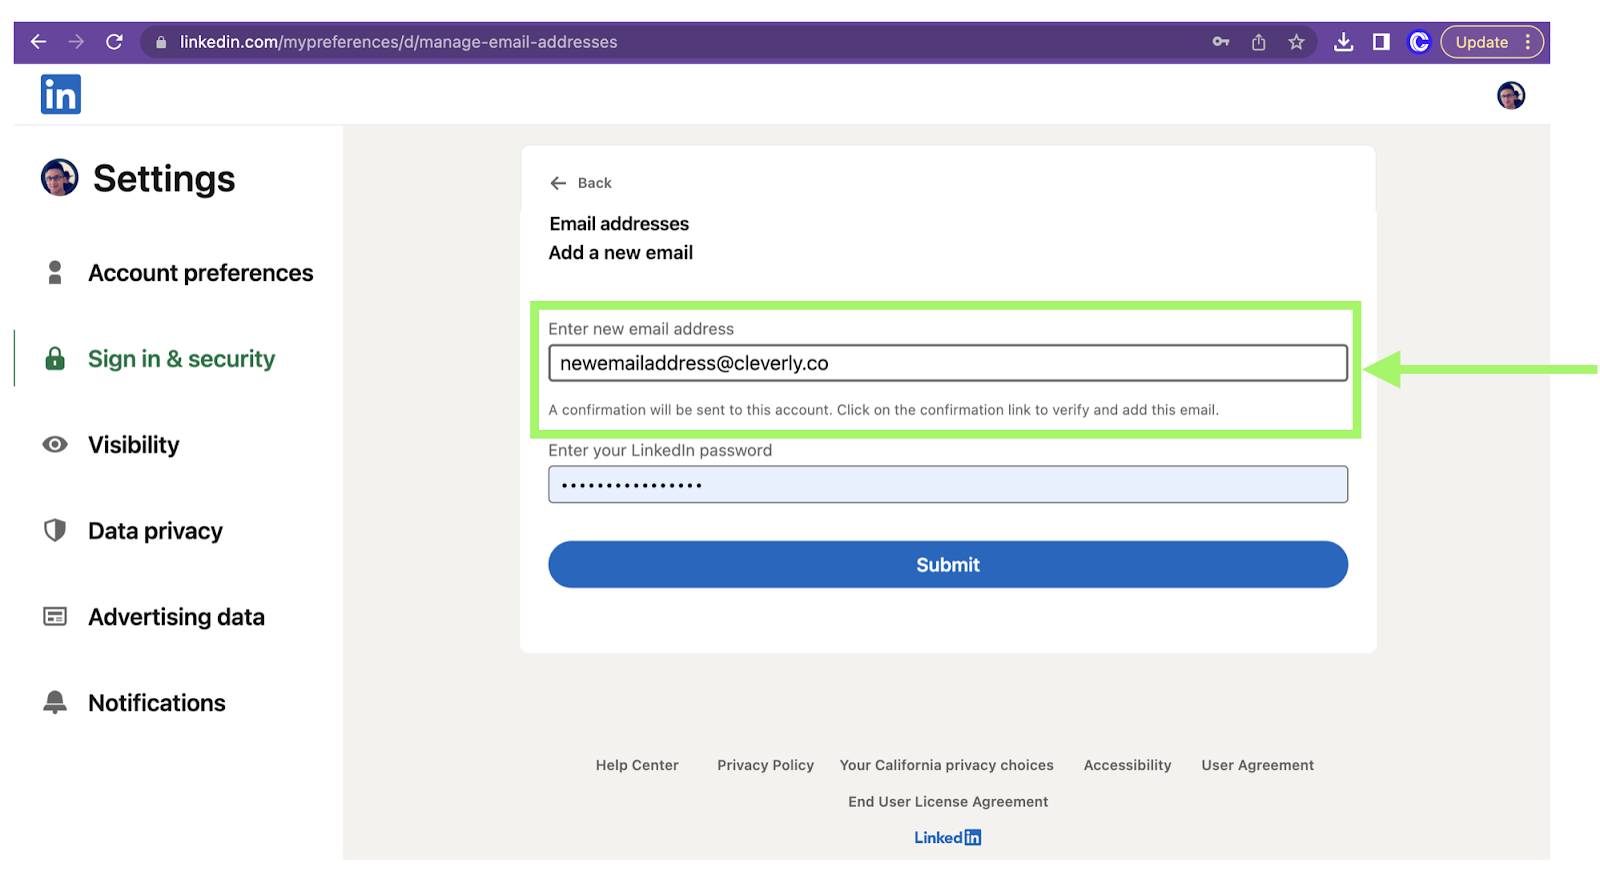
Step 5: Verify your new email address
LinkedIn will send an email to your new email address with a verification link. Click on the link in the email to verify your new email address.
If you do not see the verification email in your inbox, check your spam folder.
Step 6: Make your new email address the primary email address
Once your new email address is verified, return to the "Email addresses" section of your LinkedIn account settings. Hover over your new email address and click on the "Make primary" button that appears.
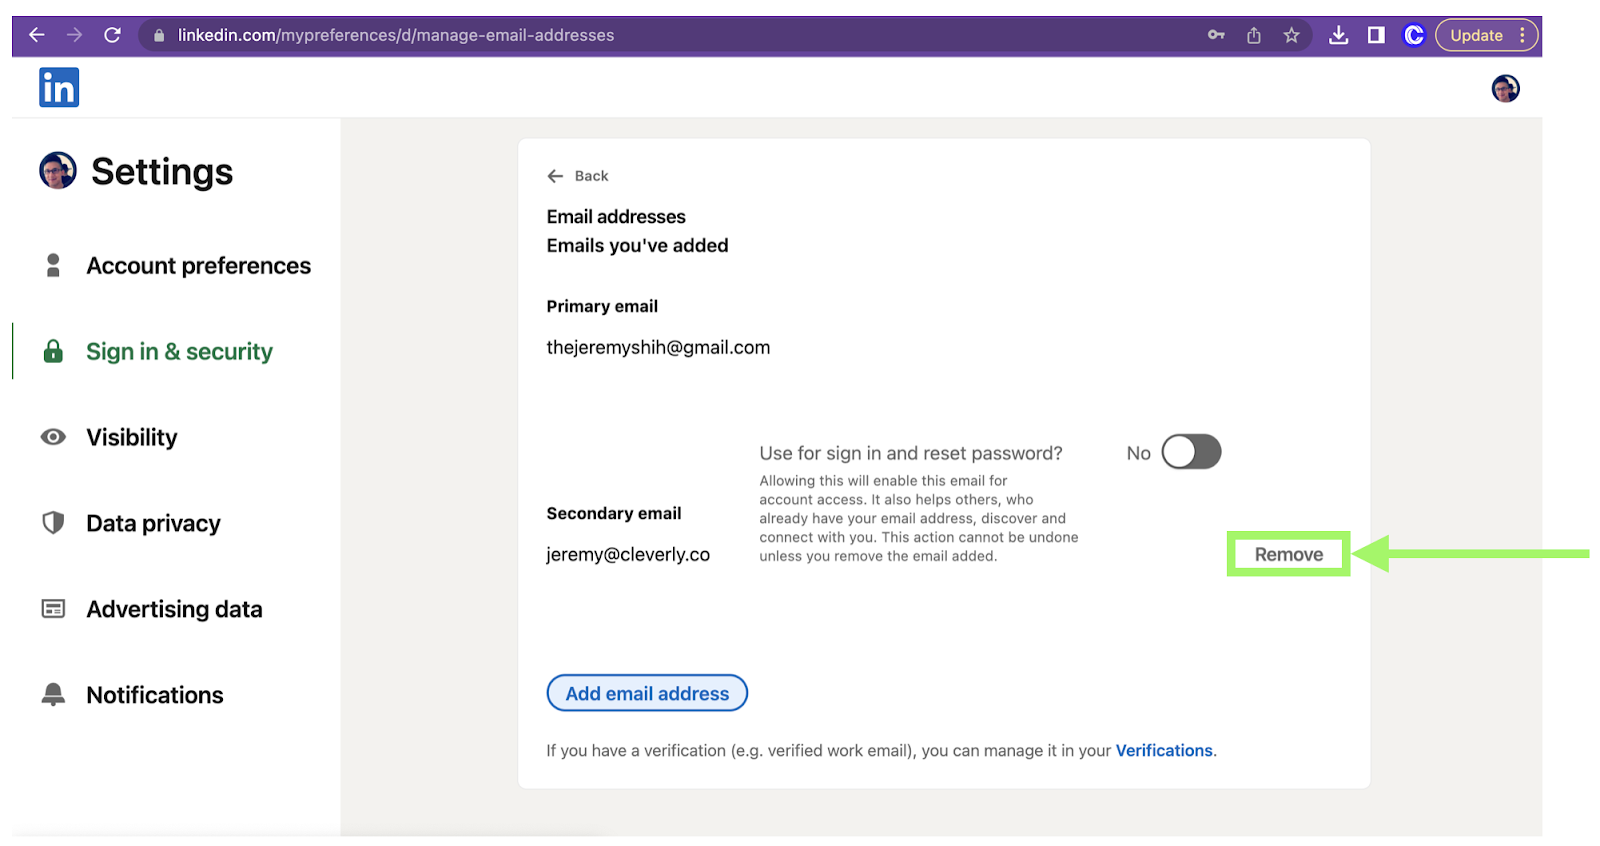
Step 7: Remove your old email address
To remove your old email address, click on the "Remove" button located next to your old email address. You will be prompted to enter your LinkedIn password to confirm the removal of your old email address.
Step 8: Save your changes
Once you have made your new email address the primary email address and removed your old email address, click on the "Save" button located at the bottom of the page to save your changes.
For Sales Navigator workflow steps, see instructions here.
Why & When to Change Your Primary Email
Keeping your LinkedIn primary email up to date is more important than most users realize. Here’s why you should consider updating it, and when it’s the right time:
- Stay on top of notifications and secure messages – LinkedIn sends all alerts, connection requests, and account security updates to your primary email. If you’re using an outdated address, you could miss important updates.
- Protect your account if your old email is compromised or inactive – An email address that’s no longer in use (or worse, hacked) poses a security risk. Switching to a secure, active account keeps your LinkedIn profile safe.
- Ensure smooth account recovery – If you ever get locked out of LinkedIn, your primary email is the key to regaining access quickly. Having a valid, accessible address makes the recovery process much easier.
When should you make the switch?
Anytime you change jobs, retire an old email account, notice suspicious activity, or want to centralize all your professional updates in one place, it’s a good idea to update your LinkedIn email right away.
On Mobile (iOS & Android) Step-by-Step Guide
Changing your primary email on LinkedIn’s mobile app is just as simple as on desktop. Whether you’re on iOS or Android, the steps are almost identical:
- Open the LinkedIn App and tap on your profile photo in the top left corner.
- Scroll down and tap Settings.
- From the Settings menu, select Sign in & security.
- Tap on Email addresses.
- Add a new email address by tapping the Add email address button. Enter your new email, then check your inbox for LinkedIn’s verification email.
- Verify your new email by clicking the confirmation link sent by LinkedIn.
- Once verified, go back into the Email addresses section and tap Make primary next to your new email.
- If you no longer want your old email on file, select it and tap Remove.
- Tap Save to finalize your changes.
That’s it! You’ve successfully updated your LinkedIn primary email on mobile. Now all notifications, security alerts, and recovery details will be tied to your updated address.
Email Privacy & Visibility Control When Changing Your Primary Email on LinkedIn
Updating your primary email is one part of managing your LinkedIn account, but equally important is controlling who can actually see your email address. LinkedIn gives you full control over this through your privacy settings.
How to Manage Email Visibility
- Go to your profile photo → Settings.
- Select Visibility from the menu.
- Scroll down to Who can see or download your email address.
- Choose the option that fits your needs:
- Only me – Keeps your email fully private and hidden from all members.
- 1st-degree connections – Lets only the people you’re directly connected with see it.
- All members – Makes your email address visible to anyone on LinkedIn.
Why It Matters
- Protect your privacy – Limiting visibility helps prevent spam, phishing attempts, and unwanted contact. You might also consider email masking services to provide a secondary layer of protection against data breaches.
- Control your networking – Restricting email visibility to 1st-degree connections ensures only trusted contacts can reach you directly.
- Best practice for professionals – Keeping your email private or visible only to close connections balances accessibility with security.
By setting the right visibility preference, you make sure LinkedIn works for your professional goals—while safeguarding your personal information.
✅ Quick Checklist: Changing Your LinkedIn Primary Email
Before you wrap up, here’s a quick-glance checklist to make sure you don’t miss a step:
- 🔑 Log in to your LinkedIn account
- ➕ Add new email address
- 📩 Verify the new email through the confirmation link
- ⭐ Make primary once verified
- 🗑️ Remove old email (optional, after new one is set as primary)
- 💾 Confirm/Save your changes
- 🔒 Adjust email visibility in Settings → Visibility
- 🧪 Test login with your new primary email to be sure everything works smoothly
And voila, you now have your LinkedIn account updated, secure, and ready to go in just a few minutes!
Conclusion
Congratulations! You have successfully changed your primary email address on LinkedIn. It is important to keep your email address up to date on LinkedIn to ensure that you receive important notifications and messages from the platform.
Looking to take your business to the next level? Let Cleverly's expert team of virtual assistants help you unlock your full potential.
With our comprehensive suite of services, including LinkedIn lead generation, cold email outreach, and cold calling services, we'll help you reach new heights and achieve your business goals.
Get started today and experience the power of Cleverly...over 1000 5-star reviews!
Frequently Asked Questions
Frequently Asked Questions
1. Can I have more than one email address on LinkedIn?
Yes. You can add multiple email addresses to your LinkedIn account, but only one can be set as your primary email at a time.
2. Why is it important to change my primary email on LinkedIn?
Your primary email is how you receive notifications, security alerts, and recovery information. Keeping it updated ensures you never lose access to your account.
3. Do I need to remove my old email after adding a new one?
No, you can keep multiple emails linked. However, it’s a good practice to remove outdated or inactive addresses for better security.
4. Can I change my primary email on the LinkedIn mobile app?
Yes. On both iOS and Android, you can add, verify, and set a new email as primary directly through the Settings → Sign in & Security → Email addresses section.
5. What happens if I lose access to my primary email?
If you can’t access your primary email, you may face difficulties logging in or recovering your account. That’s why it’s smart to always keep at least one active backup email linked.
6. Who can see my email address on LinkedIn?
You control this in Settings → Visibility. Options include keeping it private, showing it only to 1st-degree connections, or making it visible to all members.
Free Resource
How to Scale a Profitable Cold Call System
Get the complete guide — download it instantly now.
Free Ebook
Download the Free Guide
Enter your details to get instant access.
You're all set! 🎉
Your ebook is downloading now.
Click below if the download didn't start automatically.